

Peanut Chutney Recipe
Ingredients
Peanut Chutney Ingredients List
1) Oil : 2-3 tablespoons
2) Mustard Seeds (Rai) : 1 teaspoon
3) Urad Dal (Split Black Gram) : 1/2 teaspoon
4) Cumin Seeds (Jeera) : 1/2 teaspoon
5) Garlic Cloves : 7-8
6) Ginger : 1-inch piece, finely chopped
7) Onions : 2 medium-sized, roughly chopped
8) Green Chilies : 5-7 (adjust to your spice preference)
9) Roasted Peanuts : 3/4 cup
10) Roasted Chana Dal (Bengal Gram) : 1/4 cup
11) Tamarind : 1-2 inches (adjust to taste)
12) Salt : 1 teaspoon (or to taste)
13) Fresh Coriander (with stems) : A handful
14) Water : As needed for grinding
For the Tempering
15) Oil : 1-2 tablespoons
16) Mustard Seeds (Rai): 1/2 teaspoon
17) Urad Dal (Split Black Gram): 1/2 teaspoon
18) Curry Leaves: 10-12
19) Dried Red Chilies: 2-3
20) Asafoetida (Hing): 1/4 teaspoon
Let’s Start Recipe
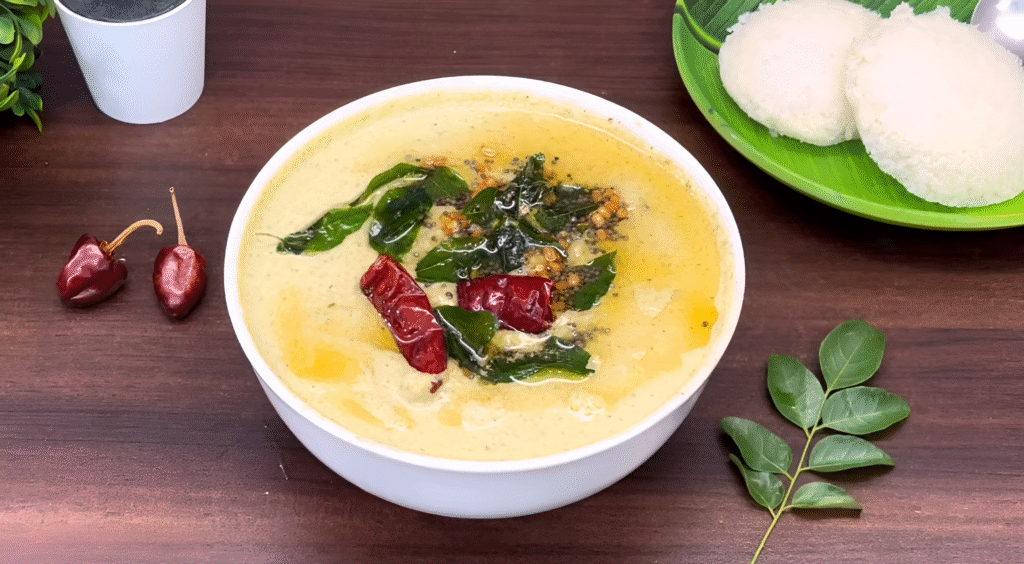
Today, we will be making a very tasty, flavorful, and delicious **Peanut Chutney** in a South Indian style. You can serve this chutney with Dosa**, **Purii**, **Upma**, or **Vada**. It is a very tempting, tasty, and easy-to-make chutney. So, let’s start the recipe quickly!
Step 1: Heat Oil and Prepare Spices
In a pan, add 2-3 tablespoons of oil. Let it heat well over medium flame (not too much oil). Once the oil is hot, add 1 teaspoon of mustard seeds (rai) and let it crackle. Then, add 1/2 teaspoon of urad dal (split black gram) and 1/2 teaspoon of cumin seeds. Fry these well until the urad dal turns slightly golden (do not over-roast it).
Step 2: Add Garlic, Ginger, and Onions
Now, add 7-8 garlic cloves and 1-inch piece of ginger (finely chopped). Fry these for 30-40 seconds on low flame until they are nicely fried. Next, add 2 medium-sized onions (roughly chopped) and 5-7 green chilies. You can adjust the quantity of green chilies according to your taste. For a spicier chutney, I added more chilies, but feel free to reduce them based on your preference. Fry the onions and chilies until the onions turn translucent and slightly pink, but do not overcook them.
Step 3: Add Roasted Peanuts and Roasted Chana Dal
Now, add 3/4 cup of roasted peanuts and 1/4 cup of roasted chana dal (roasted Bengal gram). Mixing these ingredients will enhance the taste and texture of the chutney. Cook for 2-3 minutes. If you are using raw peanuts, make sure to roast them well before adding them, and then add them with the onions.
Step 4: Add Tamarind and Salt
Now, add a small piece of tamarind (about 1-2 inches). Be careful not to use too much tamarind as we don’t want the chutney to be too sour. Add 1 teaspoon of salt (or to taste) and mix well. Turn off the gas and let this mixture cool down completely.
Step 5: Blend the Mixture
Once the mixture cools down, transfer it to a mixing jar. Add a handful of fresh coriander (with stems) to it. The stems add a nice texture and flavor to the chutney. Grind the mixture into a coarse paste without adding water. After that, add little water as needed to get a smooth consistency. I prefer a semi-thick consistency, but you can adjust it based on your taste. If serving with dosa, don’t make it too thin.
Step 6: Prepare the Tempering
In a separate pan, add 1-2 tablespoons of oil for the tempering. Once the oil is hot, add 1/2 teaspoon of mustard seeds. Let them crackle, and then add 1/2 teaspoon of urad dal. Fry the urad dal until it turns slightly brown.
Step 7: Add Curry Leaves and Red Chilies
Now, add 10-12 curry leaves and 2-3 dried red chilies. Fry them for 30-60 seconds until they crisp up. Once the curry leaves and chilies are fried, add 1/4 teaspoon of hing (asafoetida). Mix well for a few seconds and then turn off the gas.
Step 8: Pour the Tadka Over the Chutney
Finally, pour this hot tempering (tadka) over the prepared chutney and mix well.
Step 9: Serve
Your **South Indian Hotel-style Peanut Chutney** is now ready! You can serve it with **Dosa**, **Upma**, **Purii**, or **Vada**. This chutney is very tasty and can be stored in the fridge for 2-3 days. It’s very easy to make and also very healthy.
If you liked the recipe, please like, share and don’t forget to comment to the post.
Thank You….♥️